
I spent most of my working life on job sites where you either set things up right the first time or you fixed them twice. That thinking carried over when I built my home office. I wanted the gear to behave predictably: on when I sit down, off when I'm done, nothing left drawing power overnight because I forgot to flip a switch. The problem was, I had six things plugged into a standard strip and no reliable way to manage any of them without bending under the desk with a flashlight.
A Kasa HS300 smart plug power strip changed that. It has six individually controlled outlets and three USB ports, works with Alexa and Google Home, requires no hub, and costs around the same as a decent lunch out. The app is straightforward enough that I had mine configured and running a full schedule within about twenty minutes on a Sunday afternoon. If you have been living with a dumb strip and wondering whether a smart one is worth the trouble, this guide will walk you through the whole setup so you can judge for yourself.
Your desk turns on by itself at 8 a.m. and powers down at 6. Here is the strip that makes that happen.
The Kasa HS300 has six individually scheduled outlets, energy monitoring on every socket, and works with Alexa out of the box. No hub, no subscription, no fuss.
Amazon Check Today's Price on Amazon →Step 1: Download the Kasa App and Add Your HS300
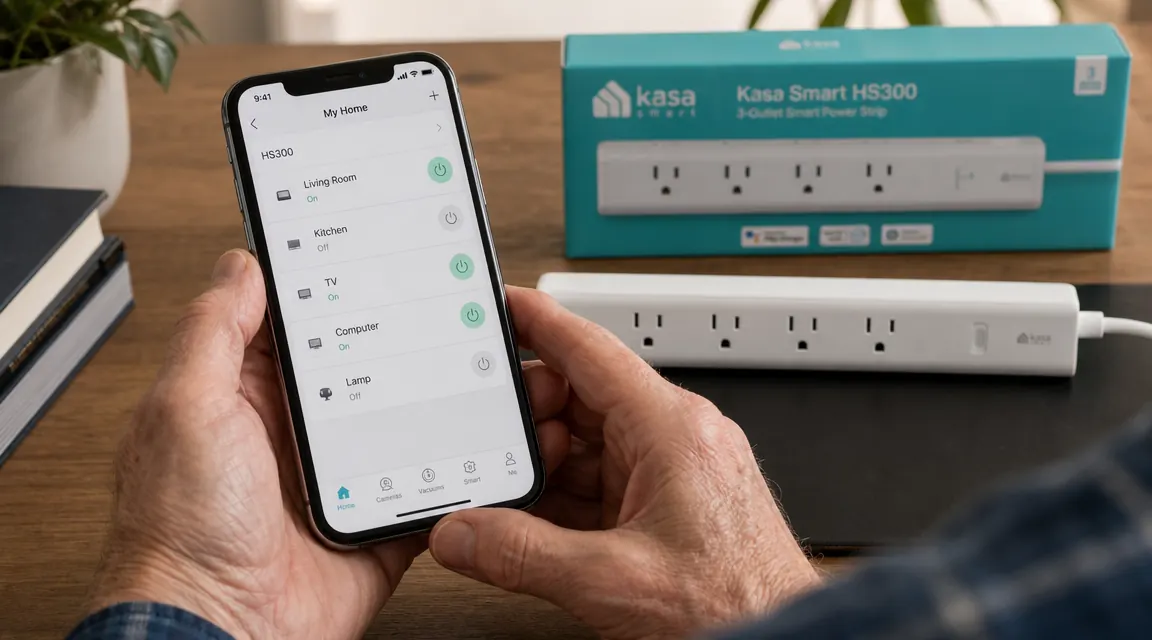
Start at the Kasa Smart app, available free for iOS and Android. Create an account if you do not have one. The account is what ties your schedule to the device, so even if your router restarts overnight, the strip picks the schedule back up when it reconnects. Once you are logged in, tap the plus icon in the top-right corner and select "Add Device." The app will detect the HS300 automatically once you plug it in. The strip pulses an amber LED while it is searching for your Wi-Fi. Select your home network, enter the password, and give the strip about thirty seconds to complete the connection. The LED goes solid green when it is done.
One thing to know before you start: the HS300 only connects to a 2.4 GHz Wi-Fi network, not 5 GHz. Most modern routers broadcast both. If yours uses a combined SSID, the phone will usually hand the device to 2.4 GHz automatically, but if the connection times out, check your router settings and make sure 2.4 GHz is broadcasting on its own network name. Once I sorted that out the first time, every Kasa device I have added since has connected on the first try.
After the strip is added, you will see it show up on your app home screen as a single device with six outlet icons below it. Each outlet is live and can be toggled on or off right from that screen. That is all you need to start using it manually, but the real value comes in the next step.
Step 2: Name Each Outlet for the Device It Controls
This step takes five minutes and saves you a lot of confusion later. Tap any of the outlet icons in the app, then tap the pencil icon to rename it. I named mine the plain way: Monitor, Desk Lamp, Laptop Charger, Fan, Speakers, and one I left as Spare for anything I plug in temporarily. Naming them matters because every schedule, every automation, and every energy report in the app uses the outlet name you assign. If you leave them as Plug 1 through Plug 6, you will be squinting at your phone trying to remember which number is which.
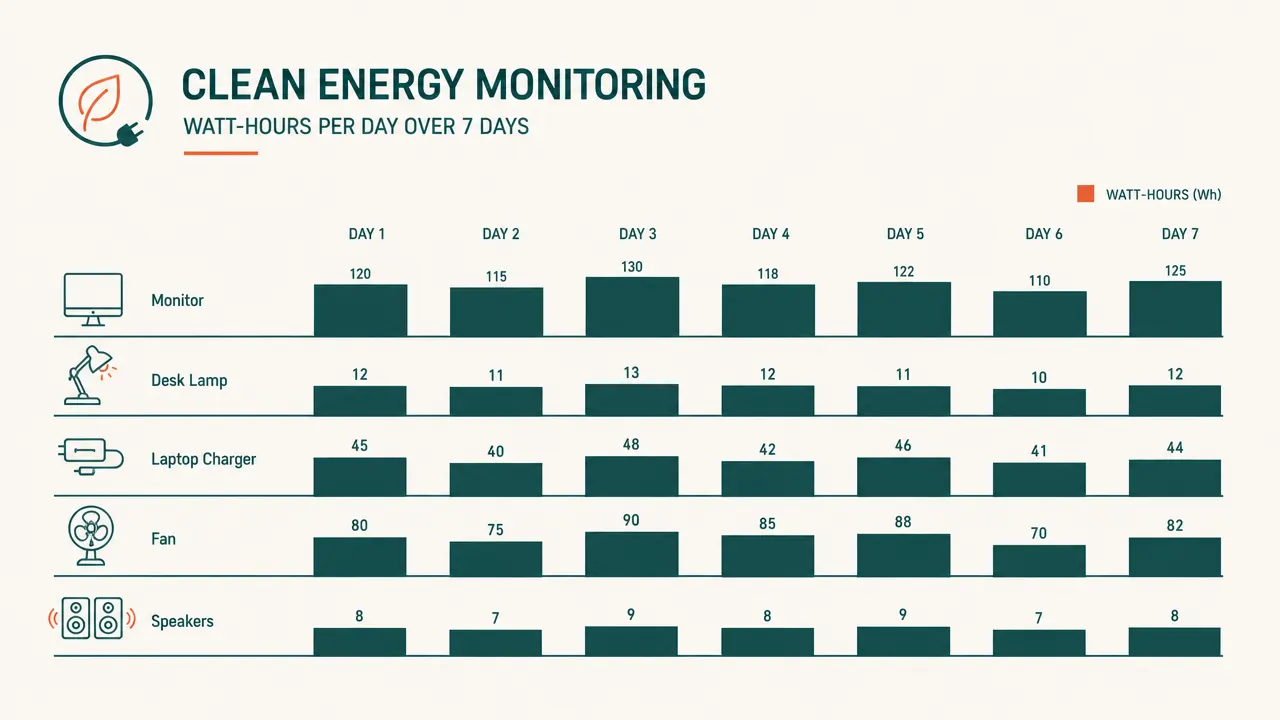
While you are in each outlet's settings screen, take a second to look at the current power reading at the bottom. Even before you set up any schedule, the HS300 is already tracking watt-hours on every socket in real time. My laptop charger, for example, draws about 48 watts while charging and drops to about 8 watts at idle. That small detail ended up being useful when I got to Step 5.
Step 3: Build a Start-of-Day and End-of-Day Schedule
This is where the strip earns its keep. Go back to the main device screen, tap the three-dot menu in the top-right corner, and select "Schedule." You will see an option to add a schedule per outlet. I set up two schedules for each outlet I care about: one to turn on in the morning and one to turn off in the evening. For my monitor and desk lamp, that is 7:45 a.m. on and 6:00 p.m. off, Monday through Friday. The fan runs a slightly different schedule because I use it more in the afternoon. The app lets you pick any combination of days of the week, so a weekday routine and a weekend routine can run side by side without interfering with each other.
A practical note on the morning sequence: if your monitor takes a few seconds to wake from a cold start and you want it ready before you sit down, set it to power on five minutes before you usually arrive at the desk. It is a small thing but it means the screen is already lit and the desktop is ready when you pull out the chair. No waiting, no pressing buttons, no fumbling with a strip under the desk.
The end-of-day schedule is just as useful. I had a habit of leaving the monitor on standby overnight, which draws about 11 watts for eight hours. Not a lot on its own, but multiplied across twelve months it adds up. Scheduling a hard power cut at 6 p.m. fixed that without me having to remember to do it manually. If I am working late and need the monitor to stay on past the scheduled off time, I just tap the outlet in the app to override the schedule for that session.
Step 4: Set Up Voice Control Through Alexa or Google Home
The HS300 works with both Alexa and Google Home without any extra hardware or paid subscriptions. To add it to Alexa, open the Alexa app, go to Devices, tap the plus icon, and choose "Add Device." Select Plug, then pick Kasa Smart from the brand list. Alexa will find your strip automatically as long as it is on the same Wi-Fi network. From that point, you can say things like "Alexa, turn on the monitor" or "Alexa, turn off the desk" and it works. I added a group called "Office" that includes the monitor, lamp, and speakers together, so I can say "Alexa, turn off the office" and all three shut down at once.
For Google Home, the path is similar: open the app, tap the plus icon, choose "Set up device," then "Works with Google," and search for Kasa Smart. Authorize the connection with your Kasa login and your outlets appear in Google Home as individual devices. You can drop them into any room you have already set up. Voice control is not something I use constantly, but it is useful when my hands are full or when I am on the other side of the room and want to cut the lights without walking over.
One thing I appreciated: the voice commands are context-aware. If I say "Alexa, turn off the lamp" from another room, it knows I mean the desk lamp in the office group because that is where the device is assigned. I never had a conflict where it shut off the wrong lamp.
I had a habit of leaving the monitor on standby overnight. Scheduling a hard power cut at 6 p.m. fixed that without me having to remember a thing.
Step 5: Use Energy Monitoring to Find and Cut Phantom Draw
This last step is the one most people skip, and it is worth doing at least once. In the Kasa app, tap any outlet and scroll down to the "Power" section. You will see current wattage, daily usage in kilowatt-hours, and a seven-day history. Sit at your desk for a normal work session, then check each outlet's reading. What you are looking for is anything drawing more than about 5 watts when you are not actively using it.
On my desk, the biggest surprise was my monitor. I knew it used power on standby, but I did not know it was pulling 11 watts around the clock, even on weekends when I was not in the office at all. My external hard drive was drawing 4 watts even when nothing was reading from it. The USB chargers on the strip were pulling about 2 watts each just by being plugged in, whether or not a device was connected. None of those are large numbers by themselves, but across a full year the monitor alone was costing me roughly $12 in wasted power. The hard drive added another few dollars. Scheduling those outlets to power off overnight and on weekends covered the cost of the strip in under three months.
The energy monitoring also helped me notice when something was not behaving right. One morning I checked the outlet where I had my old all-in-one printer connected and saw it drawing 35 watts at idle, which is unusually high for a device that was supposed to be in sleep mode. Turned out the firmware on that printer had a known bug that kept the fuser warm all the time. A firmware update fixed it and dropped the idle draw to 4 watts. I never would have caught that without per-outlet monitoring.
What Else Helps
The HS300 handles the power side of the desk well, but a few other things pair naturally with it. A dedicated desk lamp on its own scheduled outlet means you can match your lighting hours to your work hours without touching a switch. If you are running a dual monitor setup, having each screen on its own outlet gives you the option to schedule them separately, which matters if one monitor is primarily for focused work and the other is for reference or video. For anyone thinking about building out a full smart desk setup, the review on the Kasa HS300 goes deeper on build quality and the app's longer-term reliability, and the smart plug tricks guide covers a few routines I did not get into here, including using away mode to randomize outlet cycling while you travel.

Ready to stop manually flipping switches at the end of every workday?
The Kasa HS300 runs the schedule you build for it, every day, without reminders. Six outlets, energy monitoring on every socket, Alexa and Google Home ready. One setup session and your desk runs itself.
Amazon Check Today's Price on Amazon →